


I think I’m far more excited about the Bottlehead Crack than Lieven is. While the initial frustration regarding the ordering almost made us gave up, by the moment I received the package I really couldn’t wait to start the build and to finally hear what the Crack is all about.
A little DIY Story
If you’ve done DIY before, then you know that doing a clean case work is always more time consuming than doing the electronics part itself. If you’re lucky, the amp that you want to build can be ordered as a package, meaning all the correct parts needed are sold as a package, and you don’t need to order them one-by-one, sometimes from two or three different vendors. So, if I can break down the DIY amp building process, it’s probably something like:
- 20% getting all the right parts ordered and shipped to your door.
- 30% installation and soldering.
- 50% case work: measuring, designing the case for best layout, cutting boards, measuring, drilling, sanding, tapping, all the way to the smallest finishing details.
The last amp I build was a moderately complex electrostatic amp, but I was lucky to have my friend calico agreeing to do the casework for it. So the moment I finished the amp and got it running, I sent the boards assembled and mounted on a plain aluminum plate, so he could start on the casework. I think it took him roughly 6 months to finish the casework, even with his advanced CNC know how. In comparison, it took me 1 month to finish the assembly from the time I got all the parts together.
I still had other DIY projects that I had prepared to build, but I decided to postpone doing any DIY work for an indefinite amount of time, simply because I don’t feel like having to deal with the messy case work.
Building the Crack
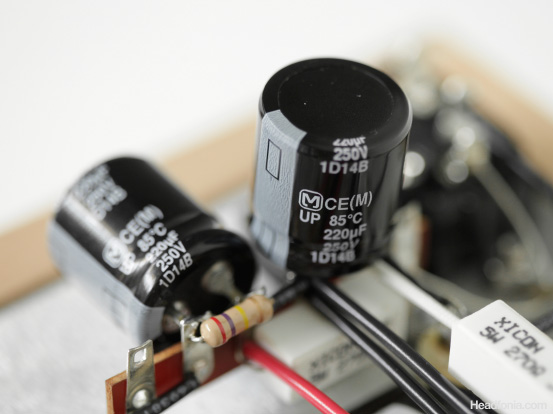
In the case of the Bottlehead Crack, I agreed to build the two amps (one for me and one for Lieven) because I knew that the assembly should not be that complicated, and that since we’re buying the package complete with the case and everything being pre-drilled, all I have to do is solder everything together and make sure not to flip the polarity of the diodes and the capacitors.
The Bottlehead Crack arrived, and to my surprise they had included a user building guide that includes step-by-step with pictures! Awesome! I don’t think any other DIY project comes with step-by-step pictures, and it makes such a big difference especially for less experienced DIYer.
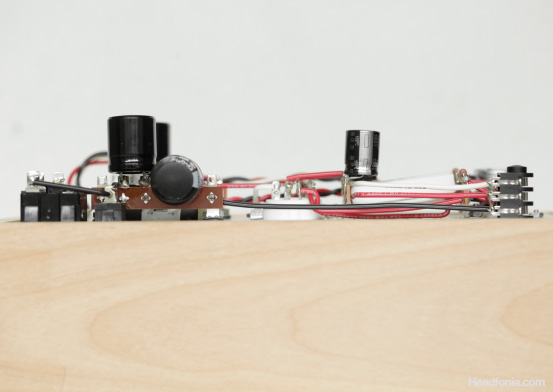
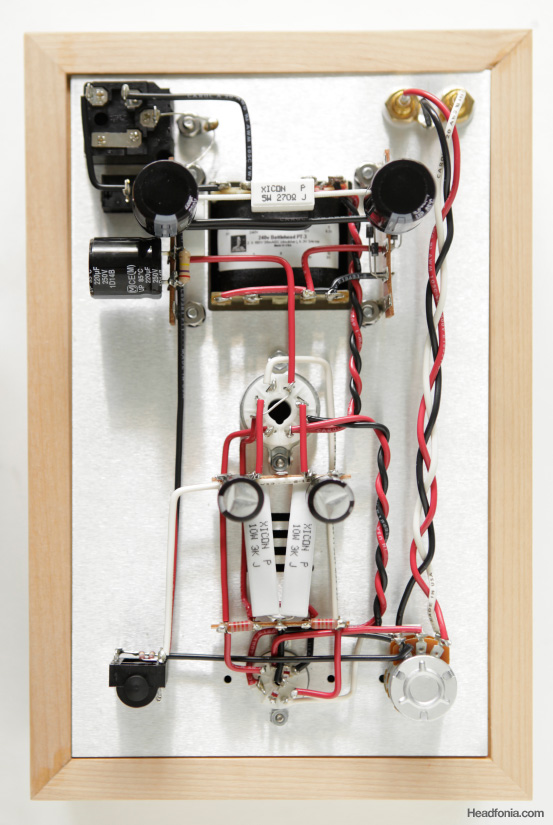
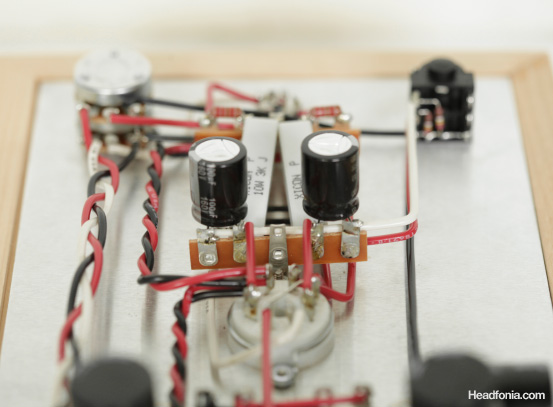
The way Bottlehead designed the layout of the amp and the use of mounting posts (for soldering your components into) makes the build easier than a typical point-to-point build. The last point-to-point amp I built was Pete Millet’s SSMH, and though it’s simpler by parts count, the build process was harder than the Crack as it was pure floating point-to-point wiring. Anyway with the Crack, I think they went the extra length to design a layout that’s easy to build. There are some spots that are quite tight for the soldering iron, so it helps to look several pages ahead to see what other components will need to be soldered into that area, and if it would be easier to do the other component first.
On the soldering junction that involves several different components together, the manual clearly state when to solder everything together, again making for a very smooth building process. I also appreciate the fact that Bottlehead included a solid-core hookup wire that makes the wiring work so much easier (solid core wires tend to hold their shape very well, so they don’t move around when you try to solder them). The hookup wire also comes with a heat resistant insulation sleeve, so they don’t melt easily when you’re doing the soldering part.
It’s always wise to take the build slowly, double checking the parts orientation, checking for shorts and ensuring every solder joint is strong and solid. Rushing through the build may lead to mistakes that would take much longer to pinpoint and troubleshoot. Not to mention if you blow a capacitor and need to order a new one to replace it.
I didn’t have any problem with both builds, other than the fact that on my first build, the power switch I received was faulty so the amp is always on (I have to unplug the power cables to turn it off). Out of the three kits we ordered, two amps had the same faulty power switch, so it’ll be good to double check with Bottlehead on this one. On the second amp, I took my time to make for a very clean wiring path, so I can have a nice looking amp for the photos for this article. 😉
I think it took me roughly 6 hours for the first build with the simplistic wiring, and 8-9 hours for the second build with the clean wiring. It took me longer on the second build as I was not in a rush to listen to the amp anymore, and because I needed to measure the length of the hookup wires and to bend them at precise lengths to create a clean look.
If you feel like trying to do a build, I think the Crack is a good project to take on. Not only because the amp sounds very good, but also because it’s relatively simple and it comes with a kickass building manual. All of the parts used are relatively big in size (except for some diodes and LEDs), so it’s not like you have to mess with a lot of tiny transistors, SMD parts, or tiny little op-amps.
I’m so enthusiastic about the Crack mainly because of the sound. Of course the fact that I didn’t run into any problems during the process does make the overall experience easier to enjoy, but ultimately it’s the sound that excites me.
Continue to the next page…
Fabio_Rocks
Nice review guys! I need one of this for my hd 650, badly! Mike my friend, can you build one for me too?:)
Mike
If the money is good, yes. 😉
Fabio_Rocks
Just one thing guys. If you love this amp is HIGLY RECOMMENDED to upgrade it with the speedball kit. From Bottlehead website: “So what does it do for the sound? The most immediate thing you will notice is a better sense of clarity. Things get tighter and quicker, bass and midrange get cleaner and more dynamic sounding, and the background gets more quiet. As with all of our upgrade kits, the improvement is easily heard.”
Mike
Yes I’ve read that too.. at the moment this is enough though.
Perhaps in the future when I feel like it I’ll do the speedball upgrade.
Jeff Kong
Great reivew! One day :3
Mike
🙂
Trent_D
I had said before that I found the K550 to be just a tad analytical sounding. After spending more time with it, I don’t think that is the case anymore. It might be burn in, but more then likely, I am just getting used to the sound. I had planned on getting a MS2+ to go with it, but I am starting to think that the dacport LX would match the sound of the K550 better (I would love to hear your thoughts on that, yes, this post does relate to the crack, i just believe in a good origin story). I was going to pair them with the asgard, but it is hard not to notice the way you rave about the crack. You had mentioned… somewhere, that there was some noise when the K550 and the crack were paired but it was very minor. That is a bit of a concern to me because on some of my classical (MN orchestra’s Beethoven’s 7th per instance), the dynamic range is INSANE, and is frequently almost whisper quiet. If there is any noise, it will be heard. Do you have any thoughts? Would the crack still work, or would I be better with the asgard (or something)?
Man, all these awesome reviews coming in, it is paradise in headfonia.
Mike
I really don’t notice the noise too much when music is playing, even with quiet passages on classical music.
You will however appreciate the truly exceptional soundstage reproduction you get from this amp.
Trent_D
Well, you have me sold. Mildly dark also sounds just right for the K550. As the kingRex is a bit out of my price range, I think I will go with the dacport lx. I love the clean, clear, detailed sound of the K550 and the lx seems like the better choice over the MS2+ if that is the sound I am looking for. I am actually really looking forward to building it myself. It sounds fun.
Mike
The Dacport LX is good enough. It’s an excellent DAC, Trent.
Chris Allen
Amazing review you guys! I got a question though, how is the Crack when compared to the Asgard?
Mike
Hi Chris,
The Asgard is more punchy, more forward, but other than that, the Crack has a cleaner sound, blacker background, far better soundstage, smoother, more refined and all.
Chris Allen
Thanks Mike!
Another question, would a warm DAC such as the HRT MS2 help the Asgard compete with the Crack by adding better soundstage and refinement? Or is the Crack still the way to go?
Mike
Not quite, Chris. The soundstage on the Crack is very spacious and I don’t think the Asgard can compete with it. The Asgard is also more grainy while the Crack is extremely clean.
Chris Allen
Whoa, really? That right there sold me. The Crack is indeed the way to go! Thanks so much, Mike!! 🙂
Mike
Yes, while I thought the Asgard was a good value for the price, the Crack is even more.
Denton Chen
Since im a complete beginner in audio DIY, its encouraging to hear how easy it is to build!! I think i might give it a go !!
Mike
Do give it a try, Denton.
John123John
mike, your build is SO clean. its Beautiful. Makes mine look like trash… jerk.
Mike
Thanks, John.
P. J.
Unfortunately I paid after the price increase. Anyone know a reason for that?
I should get mine in a week.
Mike
I don’t remember the exact reason, but if you go to their forum I think they had an explanation for that.
Basically it’s common reasons like higher prices on the components and stuff.
Altov
Hello!
What source did you used with Bottlehead Crack?
Mike
I used many different things including the DACport LX, the Kingrex UD384 (best IMO), the HRT iStreamer, the CLAS, the Tera Player.
tre54321
Mike! V200 vs Crack? 😛
Mike
I think Lieven is the one who’ll answer that as he has both amps. But he told me he’ll be away for three days or so this week. So you may have to wait a bit. 🙂
L.
You can’t really compare both. SS vs OTL DIY. The Violectric can handle about every headphone there is while the Crack is made for high impedance headphones. The V200 is great with hard to drive orthos and with high impedance phones but it’s a different sound. The overall better and 3 to 4 times more expensive amp, is the V200.
Mike
I know man.. sorry it was really difficult for me to even make sure that our orders were processed. You can read about it on the Facebook notes.
Keph
Yup i read it..anyways Great amp and i’m jealous..hehe
Nick Tam
Dacport LX + Bottlehead Crack it is for the HD650!
Mike
Yes that would be nice.
Nick Tam
What is it about the stock 6080/6AS7 that made it preferable over the Tung-Sol and GEC 6AS7Gs for you? my kit came with the GE 6080 and an unlabelled cleartop 12AU7/ECC82 and well just asking before I start going into tube rollin
Mike
I just think that everything about the sound is right for me. The treble, the bass, the pace, the soundstage.
Some of the other tubes are more mid-centric, some are mellower. Just different sound, but I like the stock sound best.
Nick Tam
I’ve got the HRT MS2+ now, kinda edged out over the Dacport LX for musical sounding, so I was wondering if I should roll in a cleaner sounding tube or a warmer sounding one, although I think I’ve realized it really is just a matter of personal preferences. Though, rereading your review, there’s no mention about which DACs you’ve used? Thx again!
Mike
Nick,
It would be hard to get rid of the grain if that comes from the source (you mention a cleaner sounding tube, I assume for this reason?). If you want a warmer sounding tube, I’m sure there are plenty to choose from out there.
I may have forgotten to list the DACs I used. They are: DACport LX, KingRex UD384, HRT iStreamer, Altmann Tera Player.
L.
I only switched the EH for a RCA clear top, so far I like the stock 6080WA most, haven’t tried the TS5998 yes iin the Crack
Nick Tam
My stock tube was a GE 6080 and I can’t get a TS5998 in Hong Kong, so my top picks that are available here are the RCA 6AS7G “Black Plates” or the GEC 6080WA, trying to pick out a musical sounding and a clean and linear 6080 amongst them all. Probably should go digging in some tube rolling threads now xP Tube addiction
L.
The 6AS7G tube rolling thread on Headfi is awesome. I’m sure you can get a TS5998 in Hong Kong. What’s the shop called again? We posted pics of it on our Facebook.
Nick Tam
I think that was wiwi tubes down at central, their online catalog doesn’t have it so i guess ill have to go down and have a look, didja buy anything while there? =D
L.
I haven’t been there, it were pictures from a reader
Rūdolfs Putniņš
Great review! I think I’ll do a Crack after I get my Dynalo together. Should complement each other perfectly.
Now we just need to start putting bets on how long will it take for Mike and Lieven to get the speedball.
L.
Can I bet too?
Mike
I dont’ know, should we do a speedball review? I wont’ have a second Crack around so it’s not going to be an A-B.
L.
I’ll ship you mine back with EMS. They’re fast! 😉
Trent_D
Now I definitely think you should. However, you have been doing so much on the site recently, I think you should take a break and relax. You should send the amps to me, along with your supply of sennheiser headphones and the Kingrex Dac to me. I will take care of this review for you.
L.
I’ll keep it in mind 😉
Kevin Cotrone
At what impedance do you think the crack starts to sound nice at? I can’t decide if I want to build this and keep my 770 pro 80s or sell my pro 80s and buy HD650s or something similar.
Mike
Kevin,
The K550 AKG has a very low impedance, though I can’t remember what.. I think 32Ω and it’s very nice with the Crack.
SoundEskimoo
Is it any better than more expensive amp like Burson? Or is it just good bang (value for money)? The price indeed very tempting on this one if you said ‘the best amp for HD650’.
L.
If it is only for HD650 like I use it, go for the Crack
SoundEskimoo
Noted.
Mike
I don’t really enjoy the Burson – HD650 pairing, I think the Crack is a better pairing. But saying that the Crack is better than the Burson is like saying my Honda minivan is better than a Ferrari because I can take my whole family in the minivan.
SoundEskimoo
Actually Crack looks like so convenient. Just practical.
Nick Tam
From memory, how would the Crack compare against the WA6 with the Sophia Princess Upgrade? Just curious because you mentioned that the SP upgrade makes the stock config sound congested and really does, open up the sound of the WA6. Just for thought
Mike
From memory, the WA6 is more detailed, more refined, wider soundstage. What impresses me is the Crack’s superior soundstage depth, blacker background, though micro detail is not as good as the WA6.
Trent_D
How is the bass on the hd650 when played through the Crack?
Mike
Very nice bass, I really have no complaints.
Trent_D
A thought occurred to me. Instead of looking for amps to try and increase the bass of the K550, I should go ahead and get the Crack, and then just make my next purchase after that the HD650, which is still a headphone I want very much, and use each headphone for their strength. HD650 for large symphonies and Jazz, the K550 for chamber music and mellow vocals.
Mike
Yes that’s the way to go.
Edward Elric
Mike, when i can try the Crack with my HD600?
and how do you think it will sound?
Mike
I’ve tried it with the HD650 and the HD580 with great results.
Chris Allen
Hey Mike, how did you check the parts for shorts and such? I think blowing out a capacitor and shorts, along with flipping the polarity of the diodes and the capacitors scare me the most.
Mike
Chris,
Checking for shorts, the easiest way is to inspect visually. If you see metal or solder tin touching, or very close, you can take a multimeter, switch to continuity tester and test if the two points are indeed shorted.
Switching polarity of the diodes and caps, this is why after doing a few solder points, I always go back and double check things. On the diodes and caps, I think I re-checked their polarity orientation a million times. 😉
The best way to do the assembly is to do it very slowly. Fast assembly in my experience is very prone to errors, and troubleshooting would take much longer than the time you save.
Trent_D
How would the Crack do for Rock if I paired it with the Superlux HD660?
Mike
I don’t have the HD660 around, but I think it should be nice, Trent.
Psycho
hey Mike, Want to ask something?
where to get this amp in indonesia with speedball upgrade? And did i need to order online from their website?
I want to pair it with hd 650 and dacport lx (still having doubt between this dac or hrt msii+)
L.
You have to order it from Bottlehead’s website indeed. I seriously doubt Mike still has time left to build amps nowadays, but I’ll let him reply
tim ramich
I find their stuff to be good, but overpriced. You can get something equivalent that doesn’t need to be built, isn’t just a plate that sits on an open box, doesn’t take 2 months to arrive, and quite frankly is better looking for around the same price or less. You aren’t getting a nice headphone jack nor potentiometer and knob. The tube sockets aren’t that great. Slotted hardware is just blah. The placement of the power switch makes me reach past the tubes, hence I burn my arms on the tubes. The transformer bell end cover isn’t coated with anything and gets hot, so it rusts. The only thing that prevents a person from making this kit themselves is that the power transformer is custom-wound by some manufacturer. I still doubt that with the numbers they’re getting that they cost a lot.
Their Speedball is really way over-priced. $125 for a few PCBs, a few transistors, a few resistors, a few LEDs, some heat sinks and mounting kits, and standoffs and screws… I could build and sell the same thing with a better PCB design for $50 and still make plenty of profit…and not have it take 2 months to arrive.
If a friend asked me if they should buy one, I would tell them no, and I would just offer to make them one for much less than they could buy it, including the labor. It wouldn’t be too hard to figure out the power transformer issue.
Nick Tam
yes but if you could have built something better, you wouldn’t have a crack right now. if you could put a bill of materials together to justify that they’re overpriced, be doc.b’s guest.
Trent_D
You are just jealous of his mechanical ability, Nick.
bala
Quick question, can someone shed some light on the cost of the Crack imported to the EU?
L.
Hey Bala, I honestly can’t remember. I think shipping was $30 and import fees I think was around 30€. The crack is still a very good value for the money, but back when we bought it at the old price, it was an incredible value for money. Mike and myself are also thinking of taking on a new Bottlehead project…
bala
Thanks L. I was considering the Crack as an upgrade from my Little dot III to suit the HD650 but I also have a recently acquired HE500 😉 to consider! I know the crack is divine with the 650 but is it as good with the HE500? Or maybe I should wait until you and Mike try out your next bottlehead project – which I guess would be the SEX 2.1!
Nick Tam
No. Mike has noted that the Crack does not drive orthos at all including the easier to drive HE400
bala
Thanks Nick & L. I will wait for the Headfonia impressions of the Sex 2.1 – feel I should have got suitable amplification before getting the HE500! I’m currently driving it with a Matrix Mstage and its not living up to my expectations 🙁
L.
The crack doesn’t do good with the HE500 Bala. Yes, it will be the SEX, but it might take a few months, we’re pretty busy.
L.
There are several NOS pairs of 2399/5998 tubes for sale on EBAY right now if anyone’s interested or looking for those tubes
Nick Tam
None of them are very balanced though so I think buyers are better off using them in the LF339
No returns either :
L.
good luck finding a balanced pair. I still think they’re good enough in the crack, they’re not bad at all, most shops don’t even test them and you never know what you get…
Nick Tam
I picked one off ebay some time ago… and a expensive boxed NOS one locally
I guess I was lucky picking a balanced piece off ebay when nobody was looking :
L.
If someone want a second hand Crack, there is one for sale for only $800 on Head-fi 😀
http://www.head-fi.org/t/624063/bottlehead-crack-w-speedball-upgrades-tubes
Nick Tam
with the TKD pot, Speedball, caps and all that, he’s selling it as new rather than used though
Great for someone who doesn’t want to DIY it themselves though!
Mike
The pot is how much? $400-$500? TKD is not cheap.
Nick Tam
Pot is around $100 so that’s pretty high end, caps are worth another $100, speedball another $100, Chatham 2399 around $65… TFK 12AU7 another $60… plus the labour costs maybe? I’m not paying $800 for that used though : especially with those tubes
$400 for a pot… lol
Trent_D
And big surprise, it is still for sale.
Joshua Tsang
What DAC would you recommend to go with this amp and HD 650?
Trent_D
The dacport lx should work very well, and that can be had for $200-250. The Kingrex ud384 with the uPower supply runs $700 and is suppose to be phenomenal.
Trent_D
The dacport lx should work very well, and that can be had for $200-250. The Kingrex ud384 with the uPower supply runs $700 and is suppose to be phenomenal.
Guest
The dacport lx should work very well, and that can be had for $200-250. The Kingrex ud384 with the uPower supply runs $700 and is suppose to be phenomenal.
Nick Tam
I think I’m about to jump if another one of these questions come up…
Please do scroll around this page. I think your question has been answered more than once and I’ve asked that same question ages ago.
Nick Tam
I think I’m about to jump if another one of these questions come up…
Please do scroll around this page. I think your question has been answered more than once and I’ve asked that same question ages ago.
Nick Tam
Please do scroll around this page. I think your question has been answered more than once and I’ve asked that same question ages ago.
Nick Tam
Please do look around this page before asking that question.
Nick Tam
Please do scroll around this page and the Q&A section before asking that question. I believe that question has been asked at least 5 times.
Nick Tam
Please do scroll around this page and the Q&A section before asking that question. I believe that question has been asked at least 5 times.
Nick Tam
Please do scroll around this page and the Q&A section before asking that question. I believe that question has been asked at least 5 times.
Nick Tam
http://www.headfonia.com/bottlehead-crack-otl-addiction/#comment-547545388
Nick Tam
Erm @headfonia:disqus sorry about that… Disqus kind of screwed up and I’m seeing double… double posts XP
Mike
Yeah I figured it’s Disqus’ fault.
Nick Tam
Before posting THAT question, please do look through the Q&A section, the Crack and the HD650 page first as that question has been asked countless times. We’re kind of tired of answering questions related to Crack + HD650 here D<
http://www.headfonia.com/bottlehead-crack-otl-addiction/#comment-547545388
http://www.headfonia.com/bottlehead-crack-otl-addiction/#comment-547534629
http://www.headfonia.com/sennheiser-hd650-600-and-580-updated-drivers/#comment-691600666
Trent_D
breathe Nick, breathe!
Trent_D
The dacport lx should work very well, and that can be had for $200-250. The Kingrex ud384 with the uPower supply runs $700 and is suppose to be phenomenal.
Trent_D
Nick does have a point though. The same two questions (which dac and which amp) have been asked, which out end, on here. Search around. You will find the answer.
Mike
It would be good if we can improve the search function on the Disqus comments. Unfortunately the platform is quite limited on that regard.
Trent_D
I don’t know the platform at all, but would it be possible to tag particular posts with a subject (like, HD650).
Nick Tam
I second the Dacport LX at $200. However if you just like a tad bit more warmth with your music, go for the HRT MS2 or MS2+. The Kingrex UD384 is a step up for $500 and can be upgradable with the PSU MKII for $420 later putting it in the hign-end category. I’d upgrade directly to the PSU MKII and avoid the UPower since the UPower runs off batteries
Mike
Joshua,
What Nick and Trent said.
m17xr2b
How would the crack go with the HD700?
Trent_D
I believe in the HD700 review, L said that they pair exceedingly well together.
Mike
Thanks Trent
L.
Awesome match!
Nick Tam
Please read this.
http://www.headfonia.com/ls-take-on-the-sennheiser-hd700/
L.
thanks Nick 😉
My Nguyen
Do you recommend the Crack for Dt880 250 ohm? How does the crack sound like compared to the Asgard and the Audio-gd NFB 12 ?
Nick Tam
Yes, yes and yes. Crack and DT880 250Z is a good combination.
Crack compared to Asgard: Crack has far deeper soundstage, cleaner sounding and deeper bass. Trumps the Asgard completely if I recall from one of Mike’s earlier comments.
Babbo Phicci
where i can get this if i’m from indonesia?
L.
You could ask Analog Head in Jakarta, I think they were planning on selling it. If not it will have to be directly from Bottlehead in the USA
Babbo Phicci
thanx L..i will wait till analog have it to sell it
Babbo Phicci
where i can get this amp at indonesia?
ryan
Probably you could ask mike to build one for you 🙂
Mike
@ryan79:disqus no no no…
ryan
What if the money is good? 🙂
L.
I doubt Mike can be persuaded 🙂
ryan
Bottlehead charges $150 if I remember correctly. Mike should charge $300
L.
Bottlehead stopped doing it
ryan
Another reason why Mike should build it for $300
Trent_D
Actually, I think they will still do it, but I believe that they would be charging an hourly shop rate of around $65. So, even if they build it in an extremely swift four hours, that would still be $260.
L.
I’m sure there are some DIY’ers in Jakarta that want to build one 😉
Mike
I really enjoy the building process actually… it’s just that I’m not sure I can commit to a reasonable time frame, unless he would be content with a 12 months timeframe. 😉
Steve
Can anyone recommend me a DAC for the Bottlehead Crack with speedball and HD650’s?
Mike
Steve,
The HRT MS2+ or the DAcport LX works very well for $300 level DACs.
Steve
I was thinking either the NuForce Icon HDP or the Schiit Bifrost, any other suggestions around this level?
Mike
No, sorry not for now.
Mike
No, actually check the Topping D20:
http://www.headfonia.com/affordable-digital-to-analog-conversion-topping-d2-and-d20/
L.
I usually use the Fiio E10 when I use the Crack + HD650
Bradford
Is this still your goto? The Crack + HD650’s are a lot of $$ together. Can I get by with the E10? Or must I splurge on the MS2+? I see the Modi has good reviews for around $100. The Audioengine D1 Premium is also under $200.
Mike
I don’t know about the Modi but the Fiio E10 or E7K works pretty good for the HD650. The Crack however is on a totally different level.
Ashneel Parahoo
Best review I read on the cracks..Thank you
Mike
You’re welcome!
Sent from my mobile device. Sorry for any mistype.
Ashneel Parahoo
I couldn’t just decide whether I could build it or if the stock crack would have been “good enough”. Well, speaking of the Stock version it is very enjoyable and I bought one after reading this and Tyll’s review. Are you planning to do a review of the Crack with the Speedball upgrade soon?
L.
We do have a guest review coming up that will cover the crack with and without the speedball (in combination with the HD650) But I can’t tell you how soon we will get this
Trent_D
As long as the voltage checks go fine, I suck with a multimeter, the speedball will be added this weekend, so I would like to say two weeks on the review. Detailed DIY work doesn’t become me with my big sloppy butcher’s hands.
L.
Thanks!
Hariadi Mastoyo
I like the sound of my PS1000 just the way they are but I don’t mind adding a bit of a warm tone to them. I am tempted to build this amp myself but I wonder the quite low impedance (32ohm) of my Grado might not suitable with Crack. I also considering ALO PAN am. Which one is better match? I really appreciate some suggestion here. Thanks a lot guys!
Mike
It’ll be good if you can come and test things out really. The PS1000 is not a very common headphone and so I have very little experience pairing amplifiers with it.
netmask254
Can some crack owner help telling the 3-dimension of the finished box? Posted on Bottlehead forum but no response. Thanks a lot!
Mike
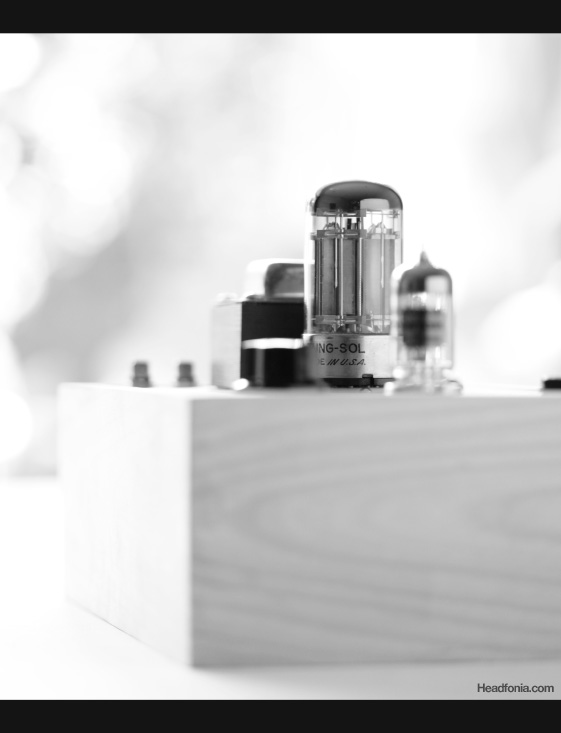
Crack: 28.5cm x 18.5cm x 9cm outside dimension.
The stock 6080 tube adds another 9cm to the height.
netmask254
Mike, thanks a lot for your help!
Mike
You’re welcome!
Mike
http://www.headfonia.com/wp-content/uploads/2013/10/crack-dimensions-headfonia.jpg
Arya
Mike, I like to build crack, but I’am green with any electonical and soldering. Is it really easy to do it? Oh, what kind of lead that you used for soldering your Crack? Is it the same as lead for ordinary electrical PCB?
Dave Ulrich
If you go slow and follow directions, it isn’t that hard. If I can do it, most people should be able to manage.
Arya
Okay. Thank you Dave.
Mike
True.
Mike
Soldering skills is a must have for building the crack.
What lead? You mean the internal wire? They supplied their own solid core wire which is very good and easy to solder.
Arya
Oh, I mean the copper you used to solder, Mike. I’m sorry for my previous word, my friend said “lead” instead of copper. Hahahaha
Mike
You mean the tin?
I use whatever I have. We just finished a new built using Oyaide tin and it does sound better than my first build.
Andy Kurniawan
Hi Mike and L,
A bottlehead fan here, can u tell me what tube you prefer with the crack?
I use speedball plus tungsram e80cc or valvo e80cc with tung sol 5998, iknow that doc prefers the mullards but i have no experience with it.
L.
Wasn’t that mentioned. Stock power and 12AU7 RCA clear top for me 😉
Dave Ulrich
I like the RCA 6AS7G for the power tube and the current production tung sol 12au7.
Andy Kurniawan
I read about the new tung sol production in Russia. Basically they bought the brand name and stick the label on their own tubes. Are they any good?
L.
I wouldn’t say they’re terrible but they’re not close to the NOS tubes
Dave Ulrich
I have found this tube in particular to be excellent. It was recommended over on the bottlehead forums awhile back. With the RCA 6AS7G, I would take it over the Clear Top for sure (I have a clear top, as well).
Mike
I prefer STOCK tubes by far.
So much I like the Stock tubes that when the stock tube broke I tried really hard to pry it from another Crack owner’s hands but they won’t sell me. Eventually I got another stock tube from Bottlehead.
And I’ve tried LOTS of different tubes with the crack. None of them has the bass and the soundstage depth the stock tube has.
Andy Kurniawan
Is it just me, because I noticed noise even when there’s no music playing with the stock driver. It’s gone when I switched to e80cc.
I don’t even know what my stock tubes are, all the markings gone on my stock tubes.
L.
Well that’s what tubes can do unfortunately
Linuels
Mike and L,
I’m planning to purchase this or the S.E.X. 2.1 for my HD 650. However, I don’t have any soldering experience. Can you provide me other pre-built desktop amp that has the same performance/sound signature of the OTL crack even if it is more expensive?
L.
Lafigaro 339 or 336, Woo Audio WA3, Woo Audio WA2
Linuels
Thanks mate. I will look these amps.
Igor Sheykin
Hello! Can you give short summary for the devices and source used to build Crack? Used sort of tin, length of wires, …
I mean if you tried different variants, and one is definitely better than others.
L.
Just use what you can get and follow the instructions. Should be good 🙂
Igor Sheykin
Thanks. Just have to wait till it arrives to Germany.
Here I have one more small question: if compare T90 and HD700 with Bottlehead Crack as amp, who would win? Who pairs better?
L.
I dont think there is a better. They both perform exceptionally good with the Crack. Just choose the headphone which sound suits you most
Igor Sheykin
Important question: what do I need to make it?
soldering-iron, tin, pliers, wire cutters, ???
L.
yes, all of that
Sergio Mejia
Hi, I have two questions, could help me please
What Fiio device would result is the best combo for HD700 + CRACK Bottlehead, basically fulfilling the function of a DAC?
You better just be a DAC or ideally buy a Amp / DAC to also fulfill the function of portable amp?
Headfonia_L.
E17 as dac
Neo
Lieven, I see you recommend this amp to the HD 600/650s very greatly. When you talk about the crack, do you mean with or without the speedball upgrade? Since the writing of this review have you had the chance to try out the upgrade out?
Lieven
This is without Speedball, I don’t have any plans to make it sound faster or cleaner or …. I like the original
Chinon.luo
@MIKE
Do you for me, Bottlehead Crack manual,DIYBottlehead Crack manual PDF
Chinon.luo
How for me, Bottlehead Crack manual,DIYBottlehead Crack manual PDF
Mail:
[email protected]
Thank you.
Dave
Have you tried emailing Bottlehead?
luo
Dave
Bottlehead NO for me.
You for me?
Edwin
Hi, can it also with a shure 846 he has 9ohm.
Lieven
Probably but the amp was built for High impedance (250-600), not 9Ohm
Siva
Hi Mike, Which DAC I can use with Bottlehead Crack? I’m planning to buy one. But i’m not sure about the source to use. Please help me.
Lieven
Mike hasn’t been on HFN since 2014 😉
I recommend a good clear neutral dac, like Sabre. Always works
Siva
Hi Leiven, I have chord mojo. Will it be good combination with this amplifier to drive HD650?
Lieven
perfect!
Siva
Hi Leiven, If Mojo is not suitable for this Amp, feel free to propose some DAC brands to consider.
Siva
Hi Leiven,
Can you help me to understand Tube Amp sound signature? How it will be, when comparing with solid state.
Lieven
Smoother, more romantic, sometimes slower, more emotional, etc
But it depends on the circuit and tubes used, you can’t really generalize a tube sound.
Siva
Thank You.! I’m going to start with Bottlehead Crack. I see this one in affordable price in Tube Amp.
Mojo + Bottlehead Crack + Beyerdnamic Amiron Home/HD650 – This is my plan.
Lieven
That’s a really nice setup. Amiron for movies and HD650 for music. Sublime
Eduardo M.
Is there any solid state AMP that has this same signature?
Eduardo M.
**Smoother, more romantic, sometimes slower, more emotional, etc
Lieven
I replied to this, right? I’d go for the V200 then if it’s warmth you seek
Eduardo M.
For the V200, which DAC signature would Lieven?
I asked about this difference (tubes and solids) because the sennheiser has a very good synergy with the tube amp, and the sennheiser again brings a solid state amp (amp 820) in which they indicate to be the ideal combination for the sennheiser (600,650,660,700,800,800S).
The V200, as you said, which has the same signature as the tube amp, with Smoother and warm sound, also plays the same impact on bass and organics with soft treble?
Lieven
yes.
For a DAC I always advise to go for something very detailed and neutral, like Sabre
Eduardo M.
Thank you for clarifying. I was looking for a signature like the tubes amp, and I’m grateful to point out and show that the V200 responds to that. Regarding the Dac Saber, would it be any dac that is using Saber chip (example ES9016S, ESS 9010-2M)?
Eduardo M.
Lieven, could you tell me what synergy the mojo is with the HD650? because if I combine, I would use this configuration while I do not have the table Amp.
For use with the V200, I was looking for a Dac to fit the warm amp, but it would also be amp / dac, while not using the V200. If combined it would be PC-Mojo-650 / PC-Mojo-V200-650
Lieven
Personally I’m not a fan as the Mojo is fast, precise and digital sounding. The Senn is slower, romantic and the combo isn’t the ideal to my ears but as a temp solution, I wouldn’t worry.
For a more long term solution, I’d advise the old Hugo for the Senns
Eduardo M.
As a DAC you have indicated for both the BH crack and the V200 a detailed and neutral Sabrer.
The Review of amp/dac DF RED you say that it is more a warm sound, but if only use the DAC of his DF with BH crack or V200, and you think?
I want to keep the HD650 as it’s known, a slow, romantic and smooth sound.
Eduardo M.
I’m very keen on the V200, but if the 650 really fit better with Tubes like BH crack? could be too. in this case the options until now would be:
PC-DF Red-BH crack or PC-DF Red-V200, but for those who do not go to BH Crack, you indicate the A20 that has a high impedance output, remembering the high outputs of the tube amplifiers, could be too. The important thing is that the amp and the dac leave the HD650 with strong, damped bass and with a natural mid frequency and soft treble. Getting a detailed, yet musical sound.
Eduardo M.
Lieven, even though the V200 is the kind of signature I’m looking to use with the 650, I’d use the amplifier connected to the computer, so I would not use the v200’s balanced outputs anyway, it would still be worth investing in it or you could name another amp of Violectric or LakePeople that has this same signature?
Lieven
So the PC will be your DAC, feeding the V200 straight from the sound card? Don’t worry about balanced as the V200 has no balanced output, only double 6.3mm.
Eduardo M.
I want to connect the V200 amp to a usb DAC, which will be connected to the PC.
Eduardo M.
Were I thinking a DAC with the Cirrus Logic CS4398 chip, these warm signature amplifiers harmonized?
Eduardo M.
Correcting, in fact the dac chip was created from this 4398, however it is the Cirrus Logic CS5361 *
Ram
Hello Lieven, Have you tried planar magnetic headphone on Bottlehead crack? OTL tube amp will good with Planar Headphones like Audeze?
DC
In the last review, you said that the signature of the 339 would be 80 degrees. Crack would be where?
DC
Lieven! Can Violectric amplifiers be softer than BHCrack? or are they different signatures? I’m looking for an amplifier for my HD650, but do not change that smooth signature, with deep bass and strong, natural media and pleasant treble.
DC
because according to the review you described the BHCRACK as heavy bass and articulated, natural medium, but very high-pitched?