


Introduction
This is the first article (of possibly several more) targeting the curious ones that might have read about DIY but never gotten around to it. The basics with DIY (and open source) is spreading the knowledge. I was a beginner just a couple of months ago. And the questions you might have, I had. So if I can, so can you.
Ok guys! Some of you might have noticed that I’m all for objectivity and subjectivity. I have no issues putting 3000 USD on a good source and headphone amp, if I can hear a difference that is. For a majority of the time, it does pay off (at least if one avoids the shiny outside crappy inside products). Sure, we’re in the business of small improvements (from the non-audiophile point of view) at a price that sometimes ain’t justified. However, as you may have noticed when I discuss cables, I consider their major advantage to be ergonomics and aesthetics. The point I’m trying to make is that I’m not a strong believer regarding increased sonic benefits from fancy wires. Just to clear the air. I’ve always been a fan of the fantastic workmanship that Toxic-Cables, Whiplash Cables and Double Helix Cables offer. But they are expensive and they’re usually back-ordered. A headphone cables isn’t that hard to make and it doesn’t cost a whole lot to build one. So… If you’re like me i.e. wanting the exact length for different applications and owning several headphones, it can and will put a big hole in your wallet, a hole that I’d rather invest in the source and amp.
Getting started with DIY will require an initial investment. Economists will call this the start-up cost. Once you lay down the cash for the basics, you’ll notice that building additional cables (or the continuous costs), and even amps or sources isn’t that expensive or complicated.
Equipment
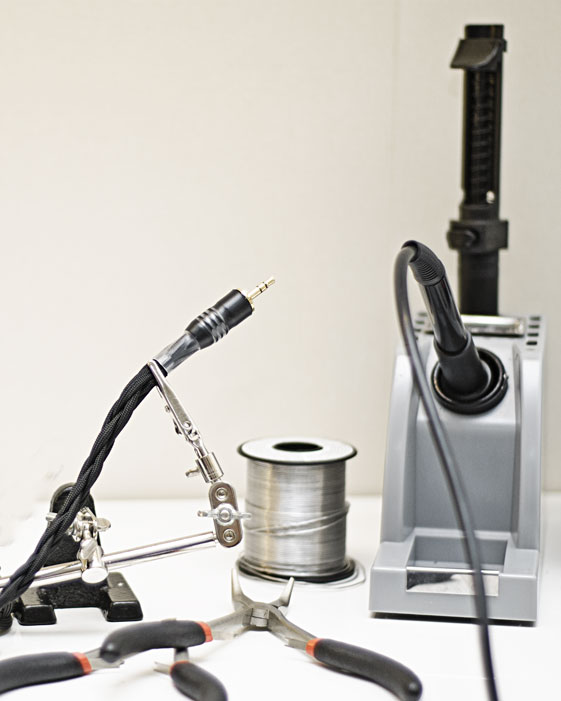
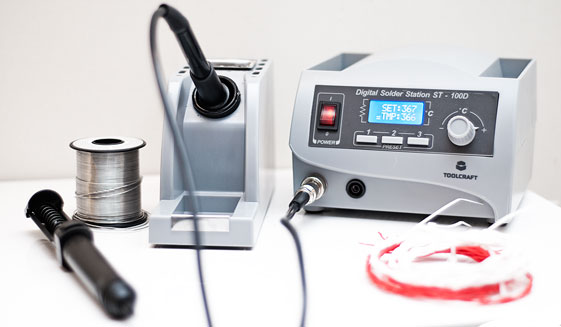
The soldering iron will be your main tool. Basically there are a couple of different types: (1) cheaper ones that have a fixed temperatured and usually are terminated with an electrical outlet plug; (2) a bit more expensive ones where the soldering iron is connected to a PSU with an analog potentiometer (i.e. a soldering station) thus varying the electrons propagating to the tip (or rather the heat that the soldering tip will attain) and last but not least (3) soldering stations with a digital display and usually multiple programmable modes of varying heat. I’d recommend going for a heftier model with more power, in case you’ll ever need to solder bigger stuff (i.e. thick cables, heat sinks etc.). Look around eBay, or e.g. Conrad.com (for EU-citizens) or Digikey (for US-citizens).
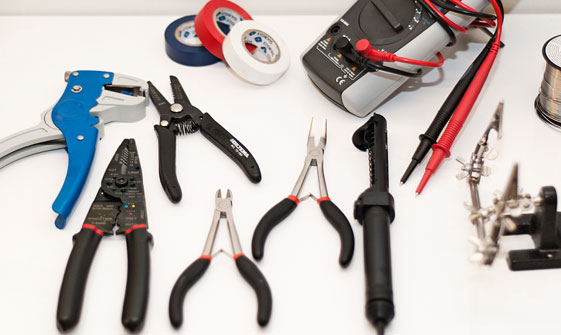
A wire stripper, a side cutter and snipped nose plierss are a requisite. So add those to your shopping list. And be sure that the wire stripper can strip AWG22 – AWG26 gauge cables, as these will be that main wires used used in DIY-audio.
The next item on our list might look a bit peculiar some call it a third hand, I call it a good way to avoid burning your fingers on hot wires. Shouldn’t cost much more than 10 USD, and be sure that the base has some weight, so it doesn’t tip over when fixing heavier stuff.
Ahh, I almost forgot. You will make mistakes. So a good way to remove solder is a solder sucker also going under the less explicit nomenclature de-soldering pump, heat up the misplaced solder and *flump* it goes into the pump. Handy.
Ok… So we can strip wire, cut wire, hold wire, and fix wire in a fixed position (e.g. mating together wire with a connector pin). You might be thinking. What wire and what solder? Since both of these might change the sonic characteristics it’s up to you. My ideology, you don’t have to agree with me, is the following. I’ve seen people investing in 10 ft of really fancy wire (we’re talking 400-500 USD worth of exotic wire) and then they’ll be sitting in the sofa with a big wire roll in their lap. Let’s discuss conductivity and resistance briefly. The resistance (we’ll skip the capacitance to avoid it getting too complicated) is determined by two major factors. The diameter (or gauge) of the wire and the material(s) used. The bigger the cross-sectional area and shorter the cable, the less resistance. Silver is the best conductor and copper is the runner-up. Silver is also quite a bit more expensive than copper. But how vital is this in audio? I can’t give a completely honest answer. I studied medicine not physics or electronics. However, as I’ve said numerous times, I’m all for evidence based results. In other words if an increased cost doesn’t attain noticeable results, why bother? I’ll stick to the fact that several wires of thinner gauge copper (at the exact legth needed) yeald less resistance and a hell of a lot cheaper than a (too long) fancy wire treated to this and that purity (a purity that a lot of the time has no basis in metalurgy since it can’t be attained).
So let’s see if we can find good wire for our needs, Brian Goto at Btg-audio (US) sells very flexible (polyethylene insulation) 26AWG copper wire at 0,80 USD/ft. Another nice and cheaper option is from Johnswireshop (USD) 24AWG quite flexible nickel-plated copper (clear teflon insulation) at 0,25 USD/ft. Or you could go for more expensive cable from previously mentioned exotic cables manufacturers. The choice is yours.
The solder is another hot topic. I’m more than satisfied with my 1 pound roll of Kester for about 40 USD. If you want to invest some extra cash for silver-doped solder, be my guest.
It’s time to talk about the connectors. What to look for, what to buy? Well that depends on what you want to do. We have to focus on two different ways of driving a headphone. Single-ended (or unbalanced), i.e. R+ L+ and ground or Balanced i.e. R+ R- L+ L- (and ground used as a reference in the amp, however not used toward the headphone/speaker). So we either have a a positive signal “pushing” in reference to a zero or a positive signal “pushing” with the help of a negative signal “pulling”. No, this isn’t the same thing as push-pull topology often used in audio, it’s just a very simplified way to explain single-ended and balanced signals.
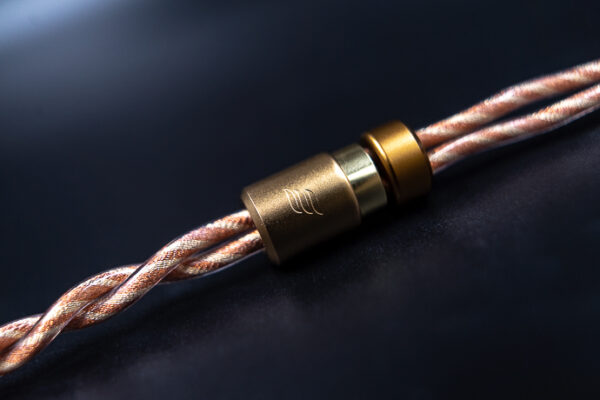
Neutrik makes a lot of different connectors, high quality and affordable pricing. They also carry more consumer-targeted products under the brand Rean. Regardless of the brand their balanced connectors, primarily 3-pin XLR, 4-pin XLR and mini-4-pin XLR “Audez’e connectors” suit most of ours needs. Be warned though that their connectors usually are made for a lot thinner gauges than some of us are used to. They might need to be modded to suit our needs, or used in non-conventional ways (e.g. not putting on the barrel).If this isn’t your cup of tea, there are more expensive options carried by Switchcraft, Oyaide, Hicon etc. Whatever floats your boat, but be sure to check the maximum wire diameter the connector accepts, and remember that we’ll be using a minimum of 2-4 wires braided together (2 wires on the headphone end and 4 wires of the amp end).
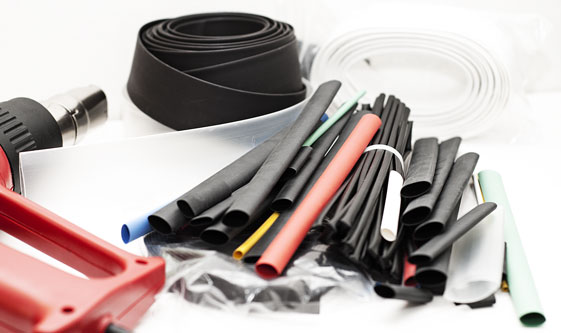
To make your cables a bit sturdier (and hide the parts that might be that nice to lay your eyes on) we’ll be needing heat-shrink tubing and a heat gun. When it comes to heat-shrink three characteristics should be contemplated: (1) shrink factor, usually 2:1, 3:1 or 4:1; (2) appearance (color, transparency, thickness) and (3) diameter. Using a higher shrink factor e.g. 3:1 or 4:1 will pay off in the end. It means that you don’t have to plan too much ahead while still creating fancy transitions from a wide diameter to a narrower one. A good vendor is Hilltop-Products (UK). They carry shorter lengths through their eBay-shop and bigger order via their website. I recommend picking up 4 sizes that will suits most needs with a 3:1 shrink factor: 9/3 mm; 12/4 mm; 18/6 mm and 24/8 mm in black and clear color. You’ll be using the 12/4 the most. The bigger ones are more relevant for full-sized connectors e.g. XLR and/or 1/4″ TRS. The heat gun is a hair-drier on steroids. Usually doesn’t cost too much. Some people use butane-cigarette lighters which I do not recommend. It might leave burn marks and ash from the butane, especially on white heat shrink tubing.
So… We finally have all the stuff we need.
Next page: Let’s get started!
thethirty3rd
This is great, thanks Valentin!
Gonna try making some cables in the summer, your guide will be one of my few references 🙂
Valentin
Sweet! Hope they turn out mighty fine. As mentioned earlier. Buy more connectors and cheap cable and experiment! It’s the only way 😉
L.
Awesome guide V! great job
Valentin
Thx mate!
Dave Ulrich
Nice!
John123John
OMG. Totally wish I had this when I got into DIY like 2 years ago.
I did alot of googling and emailing cable makers to get info. I had a very hard time matching heatshrinks to wire diameteres for some reason.. very annoying.
Another type of wire I’d recommend is silver plated copper (SPC) wrapped in teflon found for cheap(er) on ebay. Saves time from fitting a wire inside a little tube especially when running more than like 4 ft. also make sure its the soft nylon techflex and not that hard one which is super microphonic.
“Oh… And be sure to get the barrel on the cable before soldering. You only make that mistake once. ” cant call yourself a DIYer if this hasnt happened to you lol!
some advice for noobs (like me), its a learning experience and it gets easier/faster over time 🙂 (once you learn how to litz braid which referring back to the diagram over and over) +1 on the colored tape.
anyways great article/guide val!
makes me want to get back into DIY ^^
Nick Tam
Honestly the SQ of SPC has been debated… personally I’d prefer just doing a hybrid silver/copper cable if I just wanted both the sonic characteristics of silver and copper
Rūdolfs Putniņš
Great article, Val! Good to see that someone promotes fighting the Man with a soldering rod!
One thing tho- cables electrically can be described by three parameters- resistance, capacitance and inductance. And technically its not the wire that “sounds” the way it sounds- it’s the output stage of a device coping with a load that is presented by the cable. Ideally an output stage must maintain the same characteristics in all reasonable loads, but unfortunately this can be far from truth. Hence the cable may or may not change the sound of a system depending on the system. A good circuit should not have any audible change.
Good luck with your builds! I hope this isn’t the last article about DIY!
Valentin
You are very correct in the above mentioned! Thx for expanding it a bit to the readers! 🙂
More articles will most likely follow. 🙂
Nick Tam
Next up: 8 wire and 16 wire round plait!
Valentin
I like ’em. But to be honest i prefer doing round 4×2 instead. I find them more flexible and less intrusive.
Plus… It’s a lot easier to do and requires less time. But they sure can be fancy! 🙂
Nick Tam
Good guide!
A note on wire: the gauge of the wire and the size of the TRS connector you are going to use is ultimately what makes it easier to work with. Also, you may want to expand on the use of single core wire versus stranded core wire as I find this a massive difference to work with if I’m making higher strand count cables.
Valentin
Thx for the input!
I’ll add some about the above to the next one!
/V
kongmw
Nice write-up! I wish there was one like this when I first started making my own cables. Also, this soldering iron of yours looks really fancy! lol
Valentin
I’ll pop some pics to show how to make a really sweet 3,5 mm to 3,5 mm. Always needed. Not costly either. Tune in later. 🙂
/V
Sasmit
Nice article Valentin!….I hope to do this one day…How do you find the time to balance medicine and your various hobbies?
L.
I nag alot
Valentin
True dat! 😉
Nahh.. In short. I’ve cut down on most hobbies in later years. I used to be all over the place. Now I only have time for hi-fi/head-fi; work/research and my family.
It’s good to be realistic. I like popping pics, but not enough to invest in a new rig with more strobes, a full-size sensor-camera and new prime lenses etc. Since I know that I could take much better pics if I had better gear… well.. Let’s just say it limits my photography to everyday pics and headfonia-stuff.
Writing. I’ve cut down on most forum-life to the strict necessary. Not many posts on head-fi/changstar/head-case etc. And that’s why I’m not so prolific in the DISQUS here on headfonia (I try to write articles instead).
Work. Well… I’m diverting myself more and more toward Oto-rhino-laryngology and later to audiology. Hopefully be able to work with developing hearing aids and such in the future.
Working out. Well, let’s face it. Can’t lift weights as I used to. You only have that testosterone-period in your life once. Plus… Vanity. Nahh. Just trying to stay healthy, and you don’t have to train much to attain that. 😉
Family. The most important part. If I feel that I neglect them. Well, then time to cut down on the stuff above.
Cheers guys!
V
Sasmit
This makes me appreciate your great articles even more….cheers and best of luck for otorhinolaryngology
Jerry
Very useful article, this sort of information might seem like very basic stuff for many of the more advanced headphiles out there but a lot of people learn these basics wrong, so an article about making DIY cables certainly is useful, to newbies and veterans alike.
Since what you describe in this article is basically making an interconnect (ie. a cable with plugs on both ends), it might also be a good idea to have another article with tips on how to recable an actual headphone ie. what mistakes to watch out for, how to use a multimeter, how to create a DIY strain-relief etc.) After all, relatively few headphones these days have detachable cables. Furthermore, most headphone manufacturers do not put warranty on the cable, so simply recabling a headphone does not void waranty, while modifying the headphone to add a DIY socket certainly would.
Szwety
Hey great article! One question about the number of wires… Maybe I’m reading it wrong but why did you need to cut up 8 wires for a 4 wire braid? Did I miss something?
Valentin
I use 2 x 24 AWG as one, which actually equates to 1 x 21 AWG.
That’s why I use 8 wires. However I do a Quad-braid since I find flat 8-braids to be highly time-wasting and non-ergonomic.
Cheers!
V
John123John
So with the specific headphone cable you made, you have 4 separate Nylon Techflex wires/cables so you would have 2 wires per Techflex totaling to 8 wires. Are the wires in the Techflex just twisted pair?
So you just braided the Techflexes..
What is the difference between the fully insulated cables such as moon audio or cardas vs braided cables such as Toxic and BTG?
Making a cable – not rocket science but there are so many types of braids, wires, insulation, sheathing, etc… its easy to make it more complicated than it needs to be.
waiting for more DIY updates 🙂
Valentin
Fully insulated cables vs. braided cables?
Well that depends… I like Mogami Star Quad. Go to their international homepage and you will see how a star quad is designed. In short…
+PVC
+Copper screening
There aren’t that many types of braids. A stereo interconnect can be made as 3-wire or 4-wire. A mono (channel) interconnect only needs 2 wire, so a coaxial-type wire is a good choice. A headphone cable needs 4-wires minimum.
All needs can be met with a star quad. But aesthetic-wise… You can make 16-wire braids. If the headphone connectors/drivers accept it.
/V
shipsupt
As the lucky owner of a one of a kind Valentin special HD-800 cable I can say that the technique in this guide works! Nice write up V.
L.
Nice! I asked him a week or 2 ago to make one but he didn’t have time 🙁
Johann Kwan
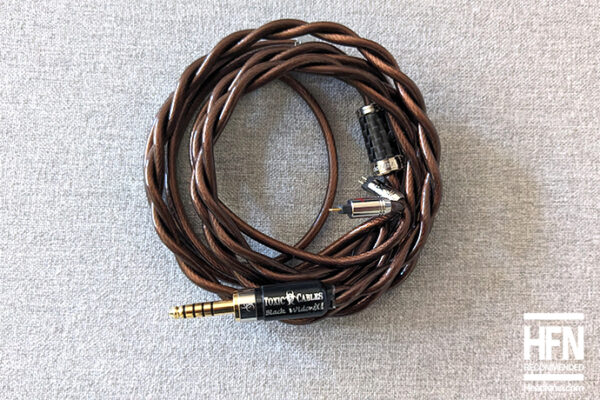
The article talks about XLR connectors but the images show 3.5mm connectors. Where did you source the 3.5mm jacks from?